Saturday, April 28, 2012

Propagating Cuttings, Quackgrass


Ten weeks ago I wrote of the “pot in pot” propagator that I was using to root dormant fig and mulberry cuttings. The propagator is nothing more than a small, porous, clay pot filled with water and with its drainage hole plugged that I plunged into the mix of peat moss and perlite that filled the larger pot. Water drawn out of the small pot keeps the peat-perlite rooting mix consistently moist.
The cuttings have sprouted with enthusiasm. And when I lift out the small pot, I see roots running around in the moist rooting mix, so I separated the plants and potted them up individually.
No need to put the propagator away now that plants are no longer dormant. With a simple covering to maintain humidity, the propagator also works well for so-called softwood cuttings, that is, cuttings that start out with leafy shoots. Technically, today’s new cuttings aren’t “softwood” because they haven’t had time yet to begin much growth. They could more accurately be called “leafy.” Their first leaves have unfolded and shoots (the “softwood”) are soon to appear. Whether “leafy” or “softwood,” such cuttings need high humidity to keep leaves from wilting until roots develop.
The propagator conversion involves nothing more than poking four sticks into the rooting medium equally spaced around its outer edge, and then draping a plastic bag over the sticks. Bright light will keep the green leaves feeding the cuttings. Direct light is a no-no because it would cook the cuttings in their high humidity chamber.
---------------------------------------------------------------
I suppose I could be nostalgic about the quackgrass (Elytrigia repens, and also commonly called witchgrass and couchgrass) stealthily making inroads into my various gardens. After all, quackgrass was my first serious weed problem in my first real garden, a vegetable plot of about 500 square feet in Madison, Wisconsin. At the time, the lakes in Madison were suffering their own weed problems, the result of “fertilization” of the water with runoff from over-fertilized, residential lawns surrounding the lakes. Giant beaters plied the lakes in those days, chopping the lake weeds which were then harvested onto boats and then trucks for disposal. “Weed-free mulch!,” thought I. 
I convinced a lake weed crew to dump a truckload of those water weeds onto my front lawn. I spread the mulch quickly -- I had to because the soggy mass started rotting within a few hours to what was beginning to smell like a a pig farm. Laying pitchfork after pitchfork of the stuff between rows of vegetables spelled quick death to the quackgrass.
My gardens now are far more extensive, no straight expanses beckon easy mulching, and water weeds are not in the offing. So for now, I am attacking quackgrass mano a mano, digging and pulling out every last shoot that I can find along with attached, running roots -- no easy task among perennial flowers. Where I can, I’ll spread a few sheets of newspaper and top that with mulch. Now is the time to attack because in about a month, new runners will begin to push further afield just beneath the soil surface. The pointed ends of these runners are sharp enough to push right through a potato.
Quackgrass is so widespread that you’d think it was native. Not so. But it has been here for a long time, coming over from Europe with the first colonists. And it’s not all bad: It is good forage for horses and cows, and has been used in herbal medicine especially for kidney ailments. “It openeth the stoppings of the liver,” according to 16th century herbalist John Gerard. Still, it’s not welcome in my garden.
---------------------------------------------------------------
I’ve got one more deathly arrow in my quiver with which to fight off quackgrass, but it must wait until the weather warms. Vinegar. Household strength vinegar sprayed on the plants kills the leaves; repeatedly killing the leaves eventually kills the plants. I boost vinegar’s efficacy by pouring 1 tablespoon of Ivory dish detergent and 2 tablespoons of canola oil into each gallon of vinegar. Vinegar works best when temperatures rise above 70° F.

Thursday, April 26, 2012

Worst Weed, Sugar Maple, and Lithops


Last week’s highlighting of quackgrass as this year’s worst weed was a passion judgement; the quackgrass seemed frighteningly abundant. But now that I’ve gotten the upper hand on it, I realize that quackgrass is lurking in the wings every year, ready to creep into any overlooked edge of the garden. So let’s glance down at two newbies vying for the worst-weed title this year: purple deadnettle (Lamium purpureum) and its cousin, henbit (L. amplexicaule).
Purple deadnettle or henbit, both with creeping stems, rounded leaves, and purplish flowers, could easily be mistaken for creeping Charlie (Glechoma hederaceae), a weed that’s been slinking around my place for years. Purple deadnettle’s upper leaves are purplish and more triangular than its cousin’s. 
Creeping Charlie is enjoyable to rip out of the ground. If you grab the stems just right and before they have rooted too strongly, you end up with a large mass of spreading stems in your fist. Not so for purple deadnettle or henbit. They don’t really creep along the ground; they grow just high enough to flop down without rooting where they touch down. But grab their stem and they break off, leaving the roots and lower pieces of stem intact and ready to start growing again. 
Creeping Charlie
Creeping Charlie seems mostly to creep into garden areas at the edges. Purple deadnettle and henbit spread very effectively by seeds, so clumps of the plants appear suddenly in the middle of the garden. They’re also sly in sprouting very late in the season, after everything has been harvested and cleaned up, at a time when I feel that the garden no longer needs my undivided attention.
-----------------------------------
As long as we’re on weeds, I’m getting reports of another weed, one that’s not in my garden but is turning up in hordes in some other gardens. The weed: maple. Yes, “maple,” as in maple trees, albeit 2 inch high maple trees -- for now, at least. 
These seedlings are probably, and hopefully, sugar maples (Acer saccharum). Another possibility is Norway maple (A. platinoides), generally disdained for creating shade too dense to allow grass or anything else to grow, for encroaching on and crowding out sugar maples, and for having ho-hum or downright unpleasant autumn leaf color. 
Yet another possibility is striped maple (A. pennsylvanicum), so-called for the prominent white stripes on its greenish bark. The seedlings are unlikely to be those of either Norway or striped maple unless some trees of either are nearby.
So what’s wrong with some sugar maple seedlings? Nothing, unless you don’t want maple trees there. The seedlings could be carefully transplanted to a more agreeable location. Or you could take a hoe, and hoe-hoe them out.
--------------------------------------
With all the activity outdoors, it’s easy to overlook what might be happening, plantwise, indoors. Take, for instance, what looked like two stones sitting pressed together in a small flowerpot at one of my sunny windows. Those two stones have separated and another set of “stones” is pushing up through the widening cleft.
The plant is one of the appropriately called “living stones,” a translation of the genus name Lithops, which the plants are also called. The stone-like appearance of these plants -- they also are gray in color -- disguise them in their natural stony habitats in South Africa. Their cover is blown once a year when the plants flower.
The last time my plants flowered was in December. For now, it looks like the cleft will yield only more “stones.”

Friday, April 13, 2012

Winter cold, Winter chill, & Late frosts


I’ve tended the same plot of ground for about 30 years, and this is the oddest winter and spring yet. 
In almost every year past, the nearby Wallkill River has swelled its banks in early April, then overflowed for a few days to stop traffic on my road. This year, the water level is so low that I’m hoping for some rain. Well, almost hoping for rain. I’m still recovering from last August and September’s record rains that made waterfront property of my home and back gardens.
Apple buds in "tight cluster"
If rainfall hasn’t been whacky enough, just look at temperatures over the past few months and especially over the past few weeks. Here in the Hudson Valley -- throughout the Northeast, in fact -- winter temperatures have been the warmest in decades. In years past, temperatures plummeted each winter to minus 25 degrees F, less so in more recent years. This winter, temperatures here never went below a balmy pus 5 degrees F. Plants know it: Bamboo (Phyllostachys aureosculcata) stayed green all winter, Chester thornless blackberry was unscathed by cold, and trifoliate orange (a citrus relative!) seedlings did not die back at all. A few more winters like this and I’ll be tempted to try growing southern magnolia (‘Bracken's Brown Beauty' is one of the hardiest) and camelias (Sasanqua camellias, which bloom in autumn, are the hardiest), which are among the few plants for which I bemoan living this far north.
If the relatively balmy winter was not enough wackiness, how about early spring temperatures? March’s string of daily temperatures in the 70s coaxed blossoms from such plants as Nanking cherry, saucer magnolia (Magnolia soulangiana), and forsythia more than 3 weeks ahead of schedule. Towards the end of March, apple buds were swelling and pears almost popped open.
The average date of the last spring frost around here is May 15th. Which is to say is that I’m worried about my fruit crop this year, a worry that has just been propped up the the forecast for a low of 24 degrees F. for tonight (March 26).
----------------------------------------
Whether or not cold kills a fruit bud depends on the depth of cold as well as the speed and stage of bud development. Recent warm weather speeded up bud development, making buds more susceptible to cold.
Bud development on fruit plants is divided into self-descriptive stages: apples, for example, go from silver tip to green tip to half-inch green, tight cluster, first pink, full pink, first bloom, full bloom, and, finally, post bloom. Charts are available(http://www.hrt.msu.edu/faculty/langg/Fruit_Bud_Hardiness.html) that give approximate killing temperatures for each stage. For apples, the critical temperatures for the various stages are, respectively, about 15, 18, 23, 27, 28, 28, 28, 28, and 28 degrees F .
So fruit might still be in the offing even after tonight’s predicted freeze. But there’s still many weeks to go before mid-May! What to do?
-----------------------------------------
The easiest course to follow now is to just relax and hope for the best. There’s always next year.
The green center of this cut bud shows that it's still in good shape.
My trees, even my older ones, are mostly dwarf in size, made that way by special rootstocks. In year’s past, I’ve scurried outside to drape blankets and other coverings over my trees. Coverings add a few degrees of cold protection, mostly for the kinds of freezes (radiation freezes) that occur on still nights with clear skies, by bouncing back downwards the heat that’s being radiated from the earth skyward. I’ve got too many trees to cover.
Someone asked me about sprinkling water on their fruit plants to fend off cold. That works, and is sometimes done by commercial growers, if water is applied continuously until it finally melts. The water releases heat of fusion as it freezes. Of course, all that water and ice can lead to limb breakage and saturated soil.
Given my number of fruit plants, I’m going with option number one. Well, almost. I have one peach tree, now in full bloom. It’s growing in a pot. Into the garage it will go, protected from cold.
--------------------------------------------------------------
The next morning: As predicted, temperatures dropped to 24 degrees F. All plant seem happy but there are still weeks of potential frost damage in the offing. 
'Surround' controls insects and delays bloom -- I hope.
My new tack is to slow bud development. This afternoon I sprayed fruit trees, bushes, and vines with ‘Surround,’ which is nothing more than kaolin clay, an effective organic insecticide. The ghostly white coating on the stems should reflect sun’s rays, keeping branches and buds cooler to delay flower bud development.
---------------------------------------------------------------
Two gardening workshops in the offing:
On April 22nd, I’ll be hold ing a pruning workshop, covering the why, when, with what, and how of pruning.
On April 28th, I’ll be holding a grafting workshop, covering the how, why, and when of grafting. In addition to a hands-on demonstration, participants will graft and take home their own pear tree.
Both workshops will be held at my “farmden,” run from 2-5:50 pm, and cost $55. Pre-registration is necessary. For information o registration, 845-255-0417 or 

Friday, April 6, 2012

A new book: Grow Fruit Naturally, pear excerpt


Now is a good time to plan and plant for some home-grown fruits -- pears, for example. Here’s an excerpt from the pear section of my NEW book, Grow Fruit Naturally (Taunton Press, 2012, signed copies available from my website, listed at right):
My 'Yoinashi' Asian pear, now in bloom
Pears come in two “flavors:” European and Asian. European pears, which are most familiar in American markets, are typically buttery, sweet, and richly aromatic -- and pear-shaped. Asian pears are typically round with crisp flesh that, when you take a bite, explode in your mouth with juice. Their flavors are sweet with a delicate, floral aroma and sometimes a hint of walnut or butterscotch. Both kinds of pears have been cultivated for thousands of years, and within each type exists thousands of varieties.
Pears of either “flavor” are easy to grow. But growing and ripening a European pear to its highest state of perfection is an art. The best one I ever tasted was at a horticultural conference at the venerable East Malling Research Station in England. At the conclusion of the conference we were led into an elegant, large, wood-paneled room, up the center of which ran a hulking, oak banquet table on which sat nothing more than a few bowls of perfectly ripened ‘Comice’ pears, ours for the tasting. I reached for a pear, took a bite, and quickly had to make my way to the conveniently opened French doors at the far end of the room to keep the ambrosial juice dripping with each bite from marring the staid surroundings.
---------------------------------------------------------
Cultivation of European and Asian pears is essentially the same, with just a few subtle differences. Both need full sun and soil that is at least reasonably well-drained. Pears can tolerate wetter soils than many other tree fruits. Among my favorite varieties are ‘Magness’ and ‘Seckel’ European pears, and ‘Yoinashi’ and ‘Chojuro’ Asian pears.
A pear spur
Once a tree reaches bearing age, prune lightly every year. Completely remove some  of the overly vigorous stems, which mostly originate higher in the tree, and merely shorten weak twigs, which mostly arise lower in the tree. Fruits are borne on spurs, which are short stems elongating only a half-inch each year. Periodically, shorten old branches more aggressively to stimulate growth of new shoots and spurs. Asian pears need more aggressive pruning than European pears, although European pears, especially, are prone to growing many overly vigorous, vertical growing shoots, which shade the plant, are not fruitful, and are more prone to disease. Cut them back when pruning or, even better, grab them in your hand and rip them off with a quick downward jerk while they are still green and growing during summer.
Each flower bud on a pear tree opens to a cluster of flowers, so pear trees, left to their own devices, usually will overbear. Thin fruits to about 5 in. apart. Thinning Asian pears is very important, spelling the difference between a harvest of ho-hum pears and ones that elicit a “wow!”
---------------------------------------------------
In most yards, pears can be grown successfully without any attention to pest control. Occasionally, a few pests warrant attention and action.
The main bugaboo in pear growing is the bacterial disease fire blight, readily identified by stems whose ends curl in shepherd’s crooks with seemingly singed, blackened leaves still attached. Diligent pruning out of blighted stems, cutting a few inches below damage, keeps the disease in check. Fire blight has never appeared on any of my more than a dozen trees.
-----------------------------------------------
Now for the reward: harvest. Asian pears are precocious, sometimes fruiting in their third season, while European pears are slower to come into bearing. 
First, the easy harvest. Asian pears. Harvest them when they are fully colored and detach easily when you roll them upward with a twist. Taste is the final test: If flavor is not up to snuff, let the fruits hang longer.
European pears must be harvested underripe. Left to fully ripen on the tree, the flesh is brown mush. The fruit must, however, be mature before it is picked and the first clue to fruit maturity is a subtle lightening of the skin’s background color. Look more closely, at the lenticels, or raised pores on the skin; they will become brown and corky at harvest time. Lift and twist the fruit. If the stalk separates easily from the stem, the fruits are ready for harvest.
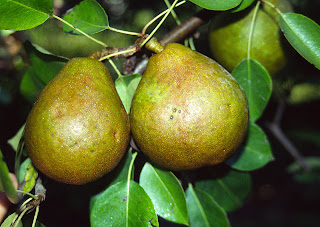
'Magness' pear - mmmm, one of the best!
You’re not yet in pear heaven. European pears need to be kept cool for awhile -- a few days for early ripening varieties, a few weeks for late ripening varieties -- before they can begin ripening. Keep them cool longer if you intend to store them.
Take some pears out of cold storage a few days before you want them for eating and put them in a cool room. They are ready to enjoy when they give slightly with pressure from your finger near the stem end. If you’ve mastered the art of pear growing, harvesting, and ripening, your reward is fruits that are neither “sleepy” nor the other extreme, “grassy,” but juicy and sweet with characteristic aromas that might include varying proportions of almond, rose, honey, and musk. Still, to quote Ralph Waldo Emerson, “There are only ten minutes in the life of a pear when it is perfect to eat.” But what sensuous ten minutes!
--------------------------------------------------
Perry is fermented pear juice, an old-fashioned beverage whose origin lies in France but reached its heyday in 16th and 17th century England. The juice was not your mother’s – or grandmother’s – pear juice. Pears for perry, a different species from European or Asian pears, are mostly too astringent for fresh eating. They’re also very long-lived: an avenue of perry pears planted in England in 1710 were reportedly still alive and fruitful in the mid-20th century. 
Perry is made like hard cider, except that perry pears need to sit for a few days after harvest for their flavors to develop. And again, after crushing, the pomace needs to sit for about a day to reduce the tannins. The end product is quite different from cider because perry pears have more fermentable and nonfermentable sugars, more citric acid, and different kinds of tannins. And because, of course, the raw material is pears.
Traditionally, perry has been a very variable product, reflecting what varieties of perry pears went into the mix, how the mix was fermented, how the fruits were grown, and the vagaries of a particular season. The drink was very much a home- or farm-made beverage, varying as much in alcohol concentration as in flavor. After experiencing a lapse in interest and various attempts to industrialize the product in the 20th century, perry is undergoing a renaissance.
Part of that renaissance lies in the re-discovery of some of the traditional perry pear varieties. ‘Arlingham Squash’, ‘Green Horse’, ‘Moorcroft’, ‘Rock’, and ‘Taynton Squash’ are among the varieties that have contributed to vintage quality perries for over three centuries. One problem with these old varieties is that their nomenclature is as muddled as the finished product can be in some years. Hundred of names exist for a much less number of varieties. Which isn’t all bad, because some of those names are worth having just because: ‘Mumblehead’, ‘Merrylegs’, ‘Devildrink’, ‘Lumberskull’, and, the longest one on record, ‘A drop of that which hangs over the wall’.
--------------------------------------------
Two gardening workshops in the offing:
On April 22nd, I’ll be hold ing a pruning workshop, covering the why, when, with what, and how of pruning.
On April 28th, I’ll be holding a grafting workshop, covering the how, why, and when of grafting. In addition to a hands-on demonstration, participants will graft and take home their own pear tree.
Both workshops will be held at my “farmden,” run from 2-5:50 pm, and cost $55. Pre-registration is necessary. For information or registration, contact me at garden@leereich dot com.