Friday, June 11, 2010


This year’s berry season officially began, on May 22nd, with the first harvest of strawberries. As with everything else in this year’s garden, the strawberries are early. Looking over my records, I see that in years past, I had to wait until early or even the middle of June to pluck the first glistening, red orbs of the season.

Those first berries are particularly welcome. First of all, they are the first fresh fruit from the garden. (Not that I haven’t been eating berries: We still have plenty of blueberries, still frozen and, when thawed, still delectable, from last summer.)

The first strawberries of the season also are particularly welcome because they are always the biggest. Every strawberry stem ends in a single flower, which is the first one to open. About thirty days after opening, if all goes well, that flower has been transformed into a ripe strawberry.

Every strawberry stem also has two branches and each of these also terminates in a flower. Secondary flowers open after the first flower. Those secondary stems likewise each has two branches terminating by a flower, opening even later. There might even be a fourth set of branches, with flowers, on these last stems.

If you were to dissect strawberry flowers under a microscope, you’d find that that there are most female flower parts, which are what swell to comprise each juicy berry, in that first flower, fewer in the two secondary flowers, and so forth, so the berries generally get smaller as the season progresses.

Opening first, the biggest flower is also most susceptible to late frost injury. Fortunately, I remembered to throw a blanket over the strawberry bed to protect the flowers during the two frosty nights earlier in May.
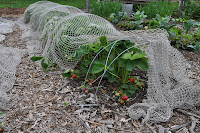
Now it’s time to throw a net over the bed to fend off birds. Those metal hoops that covered some vegetable beds to support clear plastic for cold protection also work well as supports for netting. That first harvest of the 22nd was only two strawberries. Just a few days later, we were, and are, picking bowlfuls of berries, which the birds won’t want to share.

* * * *

I’ve previously praised backyard chickens for their eggs, for their patrolling of the grounds to keep insect pests in check, and for their decorative effect on the landscape. Benefits aside, I do spend some effort corralling them into or keeping them out of parts of the yard.

Chickens scratch for food, in so doing generally messing up planted ground, even damaging some plants as they keep scratching soil away from their bases. Hence, chickens are never allowed in my vegetable gardens, something they seem to appreciate even though they could easily fly over the 3-foot-high fence around one of the gardens. The chicken’s scratchings are also limited by their being “bantam chickens,” never taller than a foot or so and thus limited in their scratchabilities.

All unfenced ground beyond the vegetable gardens – it’s chicken’s delight. Flower beds, berry beds, mixed beds with herbs, berries, and flowers. The chickens enjoy scratching around in the loose soil and mulch of those beds. In their scratching, they even toss some of the soil and mulch outside beds, so I have to every once in a while rake soil and mulch back into the beds. “Ah, fresh, loose soil and mulch,” no doubt think the chickens, who go back right into the beds to scratch around again, and again toss out some soil and mulch.

Just a little fencing dissuades chickens – my chickens, at least – from entering an area. Bamboo stakes (another use for my bamboo) three inches apart and sticking a foot-and-a-half out of the ground decoratively and effectively have kept the birds out of one portion of the garden for years. This fencing only lasts a couple of years and becomes tedious to replace over a large area, though.

I’ve upgrading chicken fencing now to “welded wire” fencing with 2 by 4 inch openings. I cut a 36 inch wide roll in half for 18 inch high fencing, which I support with a bamboo stake every few feet. So far, after a few weeks, the chickens have only gazed longingly within but never hopped over it. Over the past couple of weeks, 7 baby chicks have hatched. The chicks have no trouble strolling right through the openings of this new fencing. Their scratchings are inconsequential.

Friday, June 4, 2010


A telephone pole is just a telephone pole – unless you jazz it up and make it look prettier. And that’s what I’ve done to a couple of those unobtrusive at best, ugly at worst, brown columns of wood that support the electric and telephone wires that run along the street in front of my house.

Telephone poles can be even worse than just big, dead pieces of wood stuck in the ground. Those poles sometimes need guy wires for lateral support. To keep anyone from tripping over such wires, their lower 10 foot sections are usually girdled in bright yellow, hard plastic sheaths. Very functional and very ugly.

One day a few years ago I looked upon telephone poles and their guy wires in a new light: trellises! I’m frequently building arbors and trellises to support various vining plants, and here was a ready-made trellis just waiting to be clothed.

So I went to work planting. On one guyed pole, I removed the yellow plastic sheath and planted trumpet honeysuckle where the guy wire entered the ground. On an unguyed pole I loosely stapled a girdle of chicken wire, then planted the base of this pole with another trumpet honeysuckle.

The poles and wires look beautiful now, both dripping with the scarlet blossoms which are now at their peak color that will continue, with lesser force, all summer long. Clematis would be another vine suitable for dressing up a telephone pole or its guy wire, as would hardy kiwifruit, trumpet vine, and silver fleece vine.

Note: Don’t try this at home. I was recently informed that, as owner of the telephone poles and guy wires, the electric company decrees that nothing should be trained on them. (How about just planting at the base of a pole or wire and letting Mother Nature take her course?)

* * * *

I know that I’m allowed to plant anything – well, almost anything – in my vegetable garden. How about the lowly cabbage?

If you read the instructions on a packet of cabbage seeds, you’ll be directed to eventually space plants 2 feet apart in rows 3 feet apart. That’s a lot of space for one plant, so I’m breaking that “rule.”

My vegetable garden has beds, each 3 feet wide, rather than rows. Eighteen-inch-wide paths flank each bed. A bed of recently planted tomatoes has two rows of tomato transplants about 2 feet apart, with each transplant is spaced about 18 inches apart in the row. (That’s a close spacing but the tomatoes are each going to be growing up their own stake and pruned to only a single stem, which gives less tomatoes per plant but more tomatoes per garden area than tomatoes allowed to sprawl.)

Those tomato transplants are still small and I hate to see such an expanse of bare real estate in the middle of the bed. So that’s where I plunked down cabbage transplants, 18 inches apart. I figure that the staked tomatoes will be growing up while the cabbages are growing wide. By the time tomatoes begin to shade the whole bed and everything gets crowded, the cabbages will have made it into salads, slaw, and sauerkraut.

Friday, May 28, 2010


For the last two nights (May 9th and 10th), if anyone had asked me, “How’s your garden,” I would have answered, “I’ve got everything covered.” Literally.

Temperatures were predicted to drop to or below freezing and I had to protect two beds each of tomato transplants and blossoming strawberries. Strawberries always blossom while there’s still chance of frost so, just like every year, I threw old sheets and blankets over the beds. As for the tomatoes: A few days of warm weather the previous week had made me jump the gun on the tomatoes, planting them out almost two weeks earlier than usual. So much for being the rational gardener.

But, as I said, I got them covered. Literally. I was not so irrational as to not plan ahead, and

right after planting I installed the same “tunnels” over the tomato row that protected endive and lettuce from cold late last autumn. The setup consists of wire hoops about five feet apart over which I drape floating row cover; clear plastic goes over the row cover, followed by another wire hoop over each of the lower ones. The upper hoops sandwich the row cover and clear plastic to keep them in place and allow me to slide them up for venting in sunny weather then down on chilly nights.

Most dramatic, though, and really getting things covered, is the heavy cloth that I draped temporarily over each tunnel. That cloth happens to be bright orange, leaving two eye-catching strips in the garden.

The nighttime lows dropped to 30 and 28 degrees. This morning I drew back the orange covers, slid up the plastic cover for ventilation on this sunny day, and peeked beneath the layer of row cover, which will remain in place to provide some extra warmth. The tomatoes looked fine.

---------------------------------------------------------

And the winner for this year’s best worst weed will be, based on early performance . . . (drumroll) . . . hedge bindweed. It’s popping up out of the ground all over the place, at least in my yard. Well, not everywhere. It is wise enough to stay out of the vegetable beds, where it would not stand a chance against me, preferring, instead, the leaf or wood chip mulched ground beneath fruit trees and bushes.

Perhaps hedge bindweed is also making a grand appearance in your garden. Look for emerging vines that are so eager to grab hold of and twist around anything that neighboring sprouts work themselves airborne by twisting around each other for support. The plants are mostly vine at this point; what leaves unfold are shaped like arrowheads and 3 or 4 inches long.

Summer is when the plant is most obvious, even admired, and that’s for its funnel-shaped, white or pink flowers. They are very pretty and look like morning glories, just a little smaller. That resemblance is well-founded, because hedge bindweed is a close relative of morning glory.

Unfortunately, hedge bindweed parts ways with morning glory in being a perennial vine that spreads both by seeds and by fleshy rhizomes. A rhizome is an underground stem that can sprout to make a whole new plant, which is what happens when you chop up the ground trying to get rid of hedge bindweed.

My tack in controlling hedge bindweed is diligence: I keep an eye out for the young sprouts and whenever I see one I reach down and pull it out. Removing the greenery will eventually starve out the roots. This method worked well about 10 years ago, the last time some confluence of the previous growing season’s weather, winter weather, and who knows what else made hedge bindweed that year’s best worst weed.

-----------------------------------------------------------

Bamboo shoots are sprouting, even escaping beyond their allotted boundary, which is a heavy duty plastic barrier sunk 2 feet into the ground. Each shoot grows 6 inches a day in warm weather, something that they’ll do for the next month or so, until they reach a height of about 15 feet. Mostly, this rapid growth gladdens me, letting my bamboo patch fill in again after my drastic pruning of a couple of years ago. The escapees are a little frightening.

The smaller sprouts can be dealt with by being cut down, dug up, or just given a sharp kick, but the fatter sprouts . . . hmm . . . bamboo sprouts, bamboo shoots. Those sprouts must be edible. Peeling the papery sheath enclosing the sprout, then cutting off the tough lower portion as well as the tip portion, which consists of only layers of those papery sheaths, leaves a tender bright green shoot. Sliced into inch-long lengths, then steamed for a few minutes, the sprouts were tender with a distinctive taste that is good alone or mixed with asparagus, kale, Good King Henry, and other pickings from the spring garden.